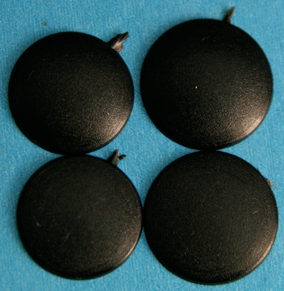
Black acrylic painting disks.

Flat black acrylic painting disks. Our flat black acrylic painting disks come in 2 sizes and a thickness of 0.5mm.
12mm: Item # BAPD12
13mm: Item # BAPD13
Unique System/Value
– Saves time.
Injection molded with an acrylic grade able to withstand higher temperatures than vinyl. Their primary advantage is that they can be ground and polished when the prosthesis is thin – a convenient feature nowadays with the larger implants being used. The uneven side of the black disk (with dull finish) should be painted on to further avoid displacement of the black disk when packing in sclera. Simply apply 3 coats of mono-poly ahead of time. Before painting, apply another coat. To accelerate drying, in between coats of mono-poly, place the painted disk in front of a ventilation exit within your painting hood. Acrylic disks will not twist as easily as vinyl ones, when subjected to heat. Apply mono-poly to bond clear button on flat or curved painted disk. Saves precious processing time, you can verify your results immediately. For curved disks, use of a special device for proper backing is crucial when bonding (see page 9).To cut down the size of the corneal button when the iris is either cured or glued, we use a Dremmel motor tool with a flat file. Some use a micro-lathe. It is best to use 1-2mm larger than needed to assure even contour after cutting down assembled iris.
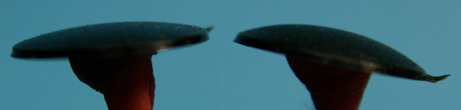
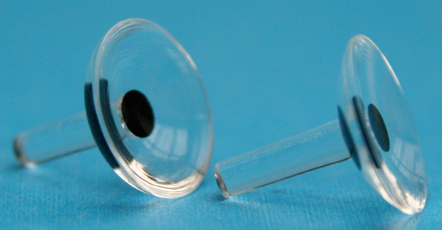
New, 4 CURVED Black acrylic painting disks and matching clear corneal button
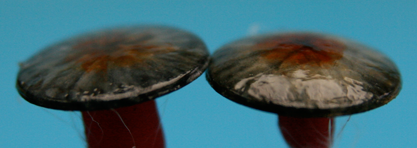
Our NEW curved black acrylic painting disks are useful when you need curved as opposed to a flat painting surface. Now comes in 2 radiuses: a new radius of 22 mm and a steeper 13mm in a thickness of 0.6mm. The new black acrylic painting disk 22 has a very slight curve (almost flat). This new disk 22 gives a more normal curved iris with depth under the limbus (instead of using flat). Comes with matching clear corneal button. For your thinnest, most-difficult-to-make ultra-thin prostheses, use the 13 mm radius with the new die with radius 9mm. Each disk comes with a matching radius clear corneal button, with or without pupil. Disks not sold separately, except as replacements.
• Starter kit includes 6 each of 4 styles, black curved acrylic painting disks and 24 matching clear corneal buttons. Pupil sizes of buttons for each disk style: 2, 2.5, 3, 3.5, 4 mm and one without pupil. Comes with a special tool for gluing (a backing device, see page 9 for info) and a large button box.
Starter Kit Item#CB4APDK
• Individual set of one curved black acrylic painting disk and matching clear button with your choice of front radius 8 or 9 mm and of pupil (2, 2.5, 3, 3.5, 4mm)
Without pupil
With disk (size 12mm & radius 13mm) #I, button 12mm.
With disk (size 13mm & radius 13mm) #II, button 13mm.
With disk (size 12mm & radius 22mm) #III, but. 12mm.
With disk (size 13mm & radius 22mm) #IV, but. 13mm.
• Additional curved black acrylic painting disks for replacements.
Disk #I (size 12mm & radius 13mm), Item#:CD#1
Disk #II (size 13mm & radius 13mm), Item#:CD#2
Disk #III (size 12mm & radius 22mm), Item#:CD#3
Disk #IV (size 13mm & radius 22mm), Item#:CD#4
Our NEW curved black acrylic painting disks are useful when you need curved as opposed to a flat painting surface.
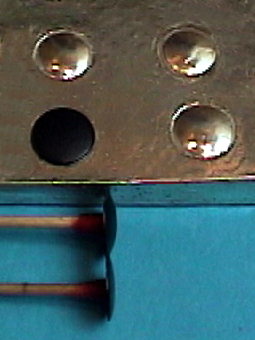
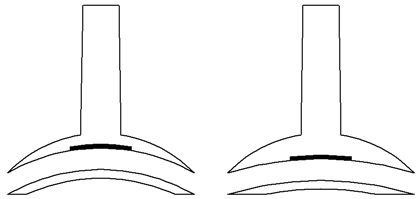
The backing device for the curved black acrylic painting disks system.
Essential when you want to pair the clear curved corneal button with the painted iris on a black curved disk. Without the backing device, optimum bonding will not occur. IMPORTANT NOTE: Use a clear curved corneal button, which suits the curved disk radius, as not all curved corneal buttons have the appropriate radius. We supply you with matching pairs, DO NOT MIX THEM. Each one of the four curved disks has its place on the backing device. You may use a small amount of mono-poly under the curved black disk to hold it to the backing device. Wax is too thick. To glue, you apply mono-poly simultaneously on both the painted disk and under the clear corneal button and rapidly place the button onto the disk, pressing firmly with 2 fingers. Before it starts to dry around the junction, release the pressure and verify visually if the button is centered, then re-apply pressure for 30 seconds. By then, the joint should be dry enough, so that the two are stable and no delaminating is present. We recommend that you let the assembled piece dry (in a painting hood, if you have one) in front of the exhaust for a minimum of 10 minutes, then immerse the assembled piece still on the backing device, in hot tap water. Use a pressure cooker (minimum 20 minutes at 20 lb – 1.5 BAR) with bottom filled with boiling water (20 mm) will pre-cure assembled disk/button and avoid disk sliding during curing of sclera.
Backing device. Each starter kits includes a backing device. For an extra backing device. Item# BD-1234